Getting Started
Welcome to Corva’s Dev Center! In this tutorial, we will show you how to get started building a Dev Center Back End app. If you would like to learn more about the different types of Back End apps that you can build, you can check out the Back End app documentation for a Stream App, Scheduled App or Task App. Before we dive into the code, here are a couple things you need to take care of…
1. Prerequisites
General Preparations
You’ll want to have completed the following steps before we move on:
Get access to the Corva Dev Center GitHub repository. Here you’ll find sample code and Sample Apps to help you get started.
Optional: Create your own personal project repository using your preferred platform e.g. GitHub, Bitbucket, etc. This will help you keep track of what you’re building and manage changes to your apps.
Understand Tech stack Node.js, Python and Javascript You need to have at least some background using Python or Node.js before you start. If you’ve never programmed before, we suggest you try a Python or Node.js tutorial before you jump in to Dev Center.
Understand basic Command Line Interface (CLI) commands for Linux or Windows. This is how you’ll configure the SDK and get app templates built out.
Install your preferred Integrated Development Environment (IDE): e.g. Visual Studio Code, PyCharm, etc. This is where you’re going to be doing all the magic, so please make sure you’re comfortable with its features and usage.
Download Git to run commands to push/pull code to your IDE and manage branching.
Install Node.js Node v18.20.3 to help manage packages and dependencies.
NOTE: Make sure to install Node.js version 18.20.3 specifically. Using a different version may cause conflicts when entering the Corva environment, and could require you to reinstall Node.js to resolve them.
Review Corva’s Python SDK documentation (short version) to familiarize yourself with features and capabilities of the Dev Center Platform that are accessible in Python.
Optional: To test Python backend applications locally, you will need to install Redis. You can easily set up Redis by using Docker to pull and run the Redis image.
Review Corva’s Node.js SDK documentation (short version) to familiarize yourself with features and capabilities of the Dev Center Platform that are accessible in Node.js.
Make sure your Dev Center Python SDK is up to date: in the command line run
pip install -U corva-sdk(or within requirements.txt file e.g. setcorva-sdk==1.3.0, then runpip install -r requirements.txt).To update to latest version of Node.js SDK: in the command line run
npm i @corva/node-sdk(or with Yarn:yarn add @corva/node-sdk).
Once you’ve completed the prerequisites, you’re ready to start creating your app!
Optional: Create and Activate Virtual Environment
Here are some guidelines to set up your environment.
Requirement: Python 3.8 to 3.11
Steps:
- Open terminal inside root of application folder.
python -m venv env
source ./env/bin/activate - Create a directory
./env/with isolated Python environment inside. You will be able to install needed packages there. - Activate the new environment.
NOTE: From now on you must always have activated virtual environment when working with the project.
If you're working within a virtual environment, remember to install the SDK dependencies inside that environment as well. Otherwise, the SDK may not function as expected.
Optional: Install Make Dependency
Here is a guideline to install make dependency.
- Install make
make install
make all
Considerations for Windows users
1. GNU Make Not Available by Default on Windows
Issue: Windows does not come with make pre-installed, which breaks many make run or make test workflows.
Suggested addition:
Via Chocolatey (recommended):
Install Chocolatey
Run:
choco install make
Via MSYS2:
Download from https://www.msys2.org/
Run:
pacman -S make
2. Reminder: Add Python and Node.js to PATH
Issue: If not added to PATH, commands won't run in terminal.
Suggested addition:
During installation, ensure the following option is selected:
- ☑ Add Python/Node.js to PATH
2. Creating an App
Now, we’ll show you how to create a new app using the Dev Center’s App Wizard. You can watch the video and follow the steps below:
NOTE: In order to view videos in high resolution, please click on the Settings icon, then select the highest resolution available.
First, Log in to Corva using your username and password
Click the icon for Dev Center in the top right part of your browser window
Click
Add New App. You’ll do this for both Front End and Back End appsClick on
Back Endto select a new Back End app and click Next
Now you will have to choose what kind of Back End app you want create. There are three types you can choose from in the Corva SDK - Streaming, Scheduled Task. For the purposes of this tutorial, we’re going to make a stream app.
Click on
Streamto select a new Stream app and click NextGive your app a Name. This is the name that will appear in the Dev Center Store and will be used in the app key to refer to your app
Select the data that your app will follow from the dropdown menu. This is the data stream that generates the event that will be used to trigger your app’s execution. Choose enhanced WITS for the purposes of this tutorial.
Select segment and category and click next Tagging your app as a drilling or completions app will help your end users find your app in the App Store more easily
If your app requires storing custom data, you can create a dataset now. For the purposes of this tutorial we will skip it
- Make no changes in Dataset Creation and click Next
3. Copying App to Terminal
If you’ve made it this far, you’re doing great! The next step is to copy the app template to your development environment. The Dev Center App Wizard makes this easy by generating the string you need. You can watch the video and follow along with detailed instructions below:
NOTE: In order to view videos in high resolution, please click on the Settings icon, then select the highest resolution available.
Here’s how to copy the app template to your terminal window:
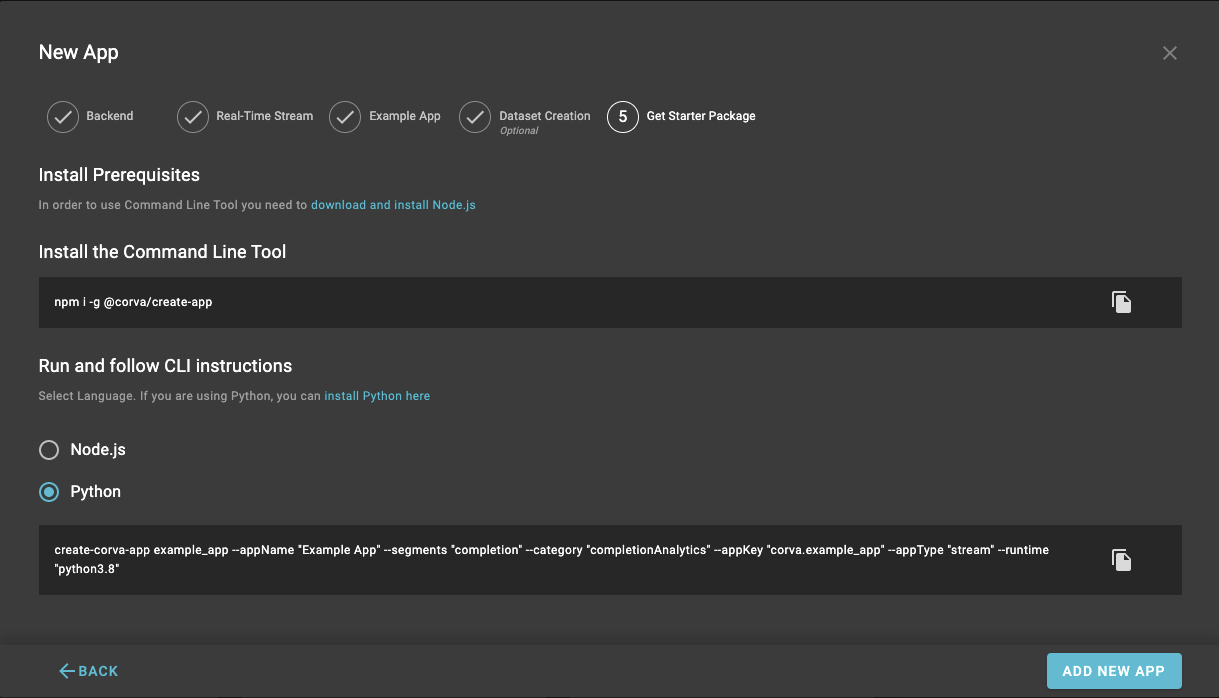
From the App Wizard, copy the string to install the Command Line Tool
Go to the command line interface and paste it and press enter to install
Select a programming language for your Back End; we support both Node.js and Python
Copy the
create-corva-appCommand Line Interface instructions and paste it in your CLI. Press enter to build out the templatesFinalize your app in the App Wizard by clicking
Add New App

How to select your preferred back end language.
At this point, you have a backend app template on your local machine that will display hello world in your console logs. You can modify it to include your own custom logic or continue following the tutorial to upload and publish your app.
4. Upload and Publish
Here, we are going to publish your app live in the Dev Center to test it out. You can watch the instructions in the video and follow the steps below:
NOTE: In order to view videos in high resolution, please click on the Settings icon, then select the highest resolution available.
Open finder in Mac or Explorer in Windows and navigate to the directory where you’re building your Back End Corva app - e.g.
c:/drilling_app/For a Python App select and zip up the following files:
lambda_function
manifest.json
requirements.txt
src (if applicable)
Required files for a Python app
For a Node.js App select and zip the following files:
src
manifest.json
test
index.js
package.json
package-lock.json
yarn.lock
Required files for a Node.js.App
- Using your browser, navigate to your app in Dev Center
/ Apps / New_App_Name / Versions - Drag and drop the newly zipped file into the browser window, or click the upload button to upload via file explorer. You can optionally add version notes to document any changes that were made to your app.
- Click
Uploadto initiate the file upload to the Dev Center. Allow time for the app to be queued, processed, build and deploy. This process will depend on the size of your app and can take anywhere from seconds to a few minutes. It is highly sensitive to the sizes of the included libraries and packages your app uses. - When the upload has successfully completed, the app should be in
Draftstatus. ClickPublishto make your app available to be visible in the app store. - Click
Labeland choose either Stable Release or Beta. - Select app visibility from dropdown. You can select
Private(not visible in the store),Developer(visible only to developers in your company), orCompany(visible to all users in your company)

App visibility feature options
5. Add App to an Asset
Now that the app is published in the store, it is available to be used on a company asset. Back End apps need to be added to the asset app stream to be invoked when new data is received. Watch the video and follow the detailed steps below:
NOTE: In order to view videos in high resolution, please click on the Settings icon, then select the highest resolution available.
NOTE: Back End apps can only be added to a single asset at a time.
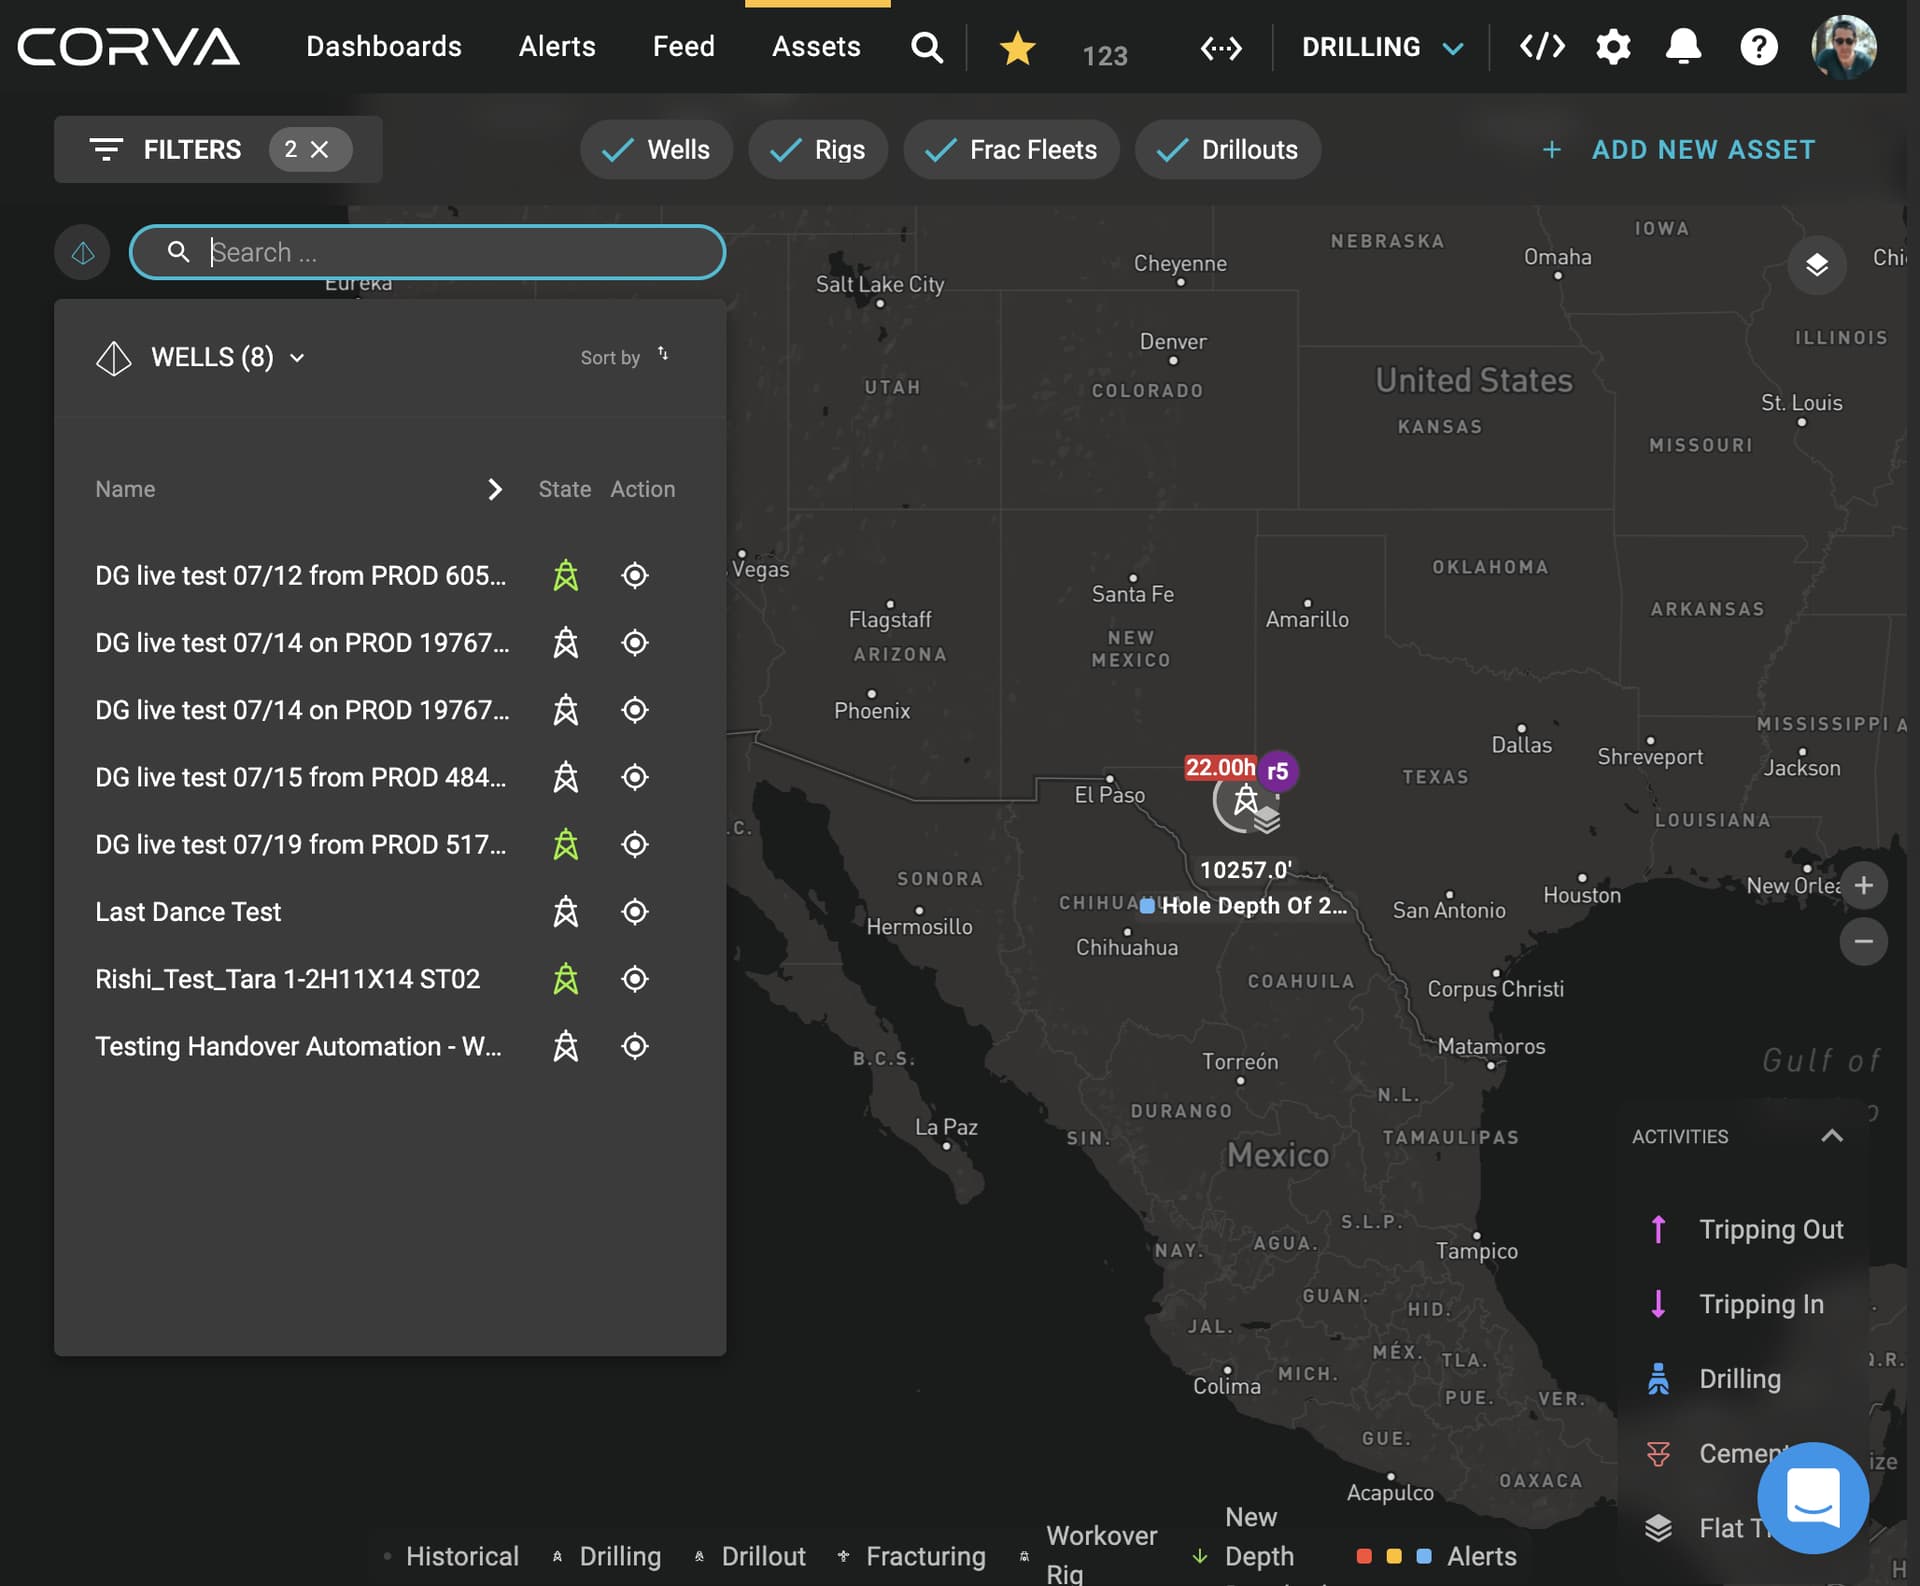
1.In your browser, navigate to the Corva main page via top left Corva icon in navbar

Corva main page
Click on
Assetslink in navbarSelect and click on the asset name or search for the desired asset

How to search for an asset
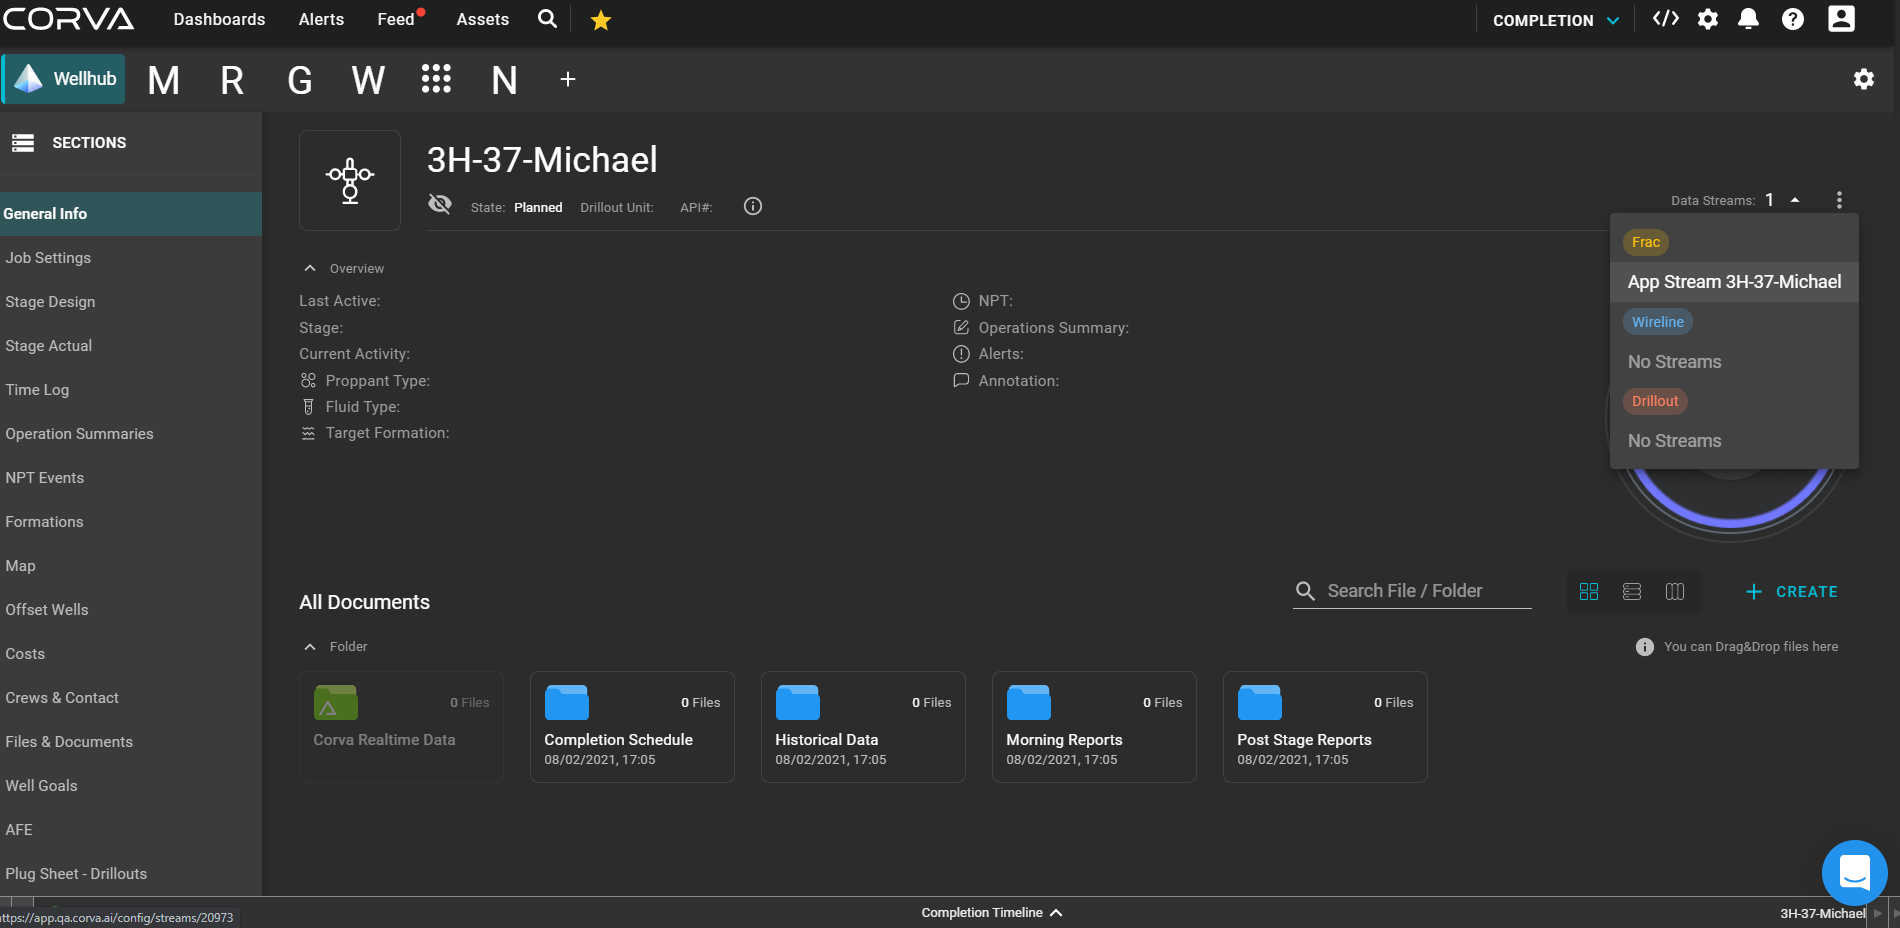
Within the asset wellhub page mouse over to far right and click on the
Data Streamdropdown arrowIn the dropdown, click on the desired
App Stream Name. This is where you can select which app stream you want your app to run in. This is the stream that will trigger your app to execute.

Select app stream name
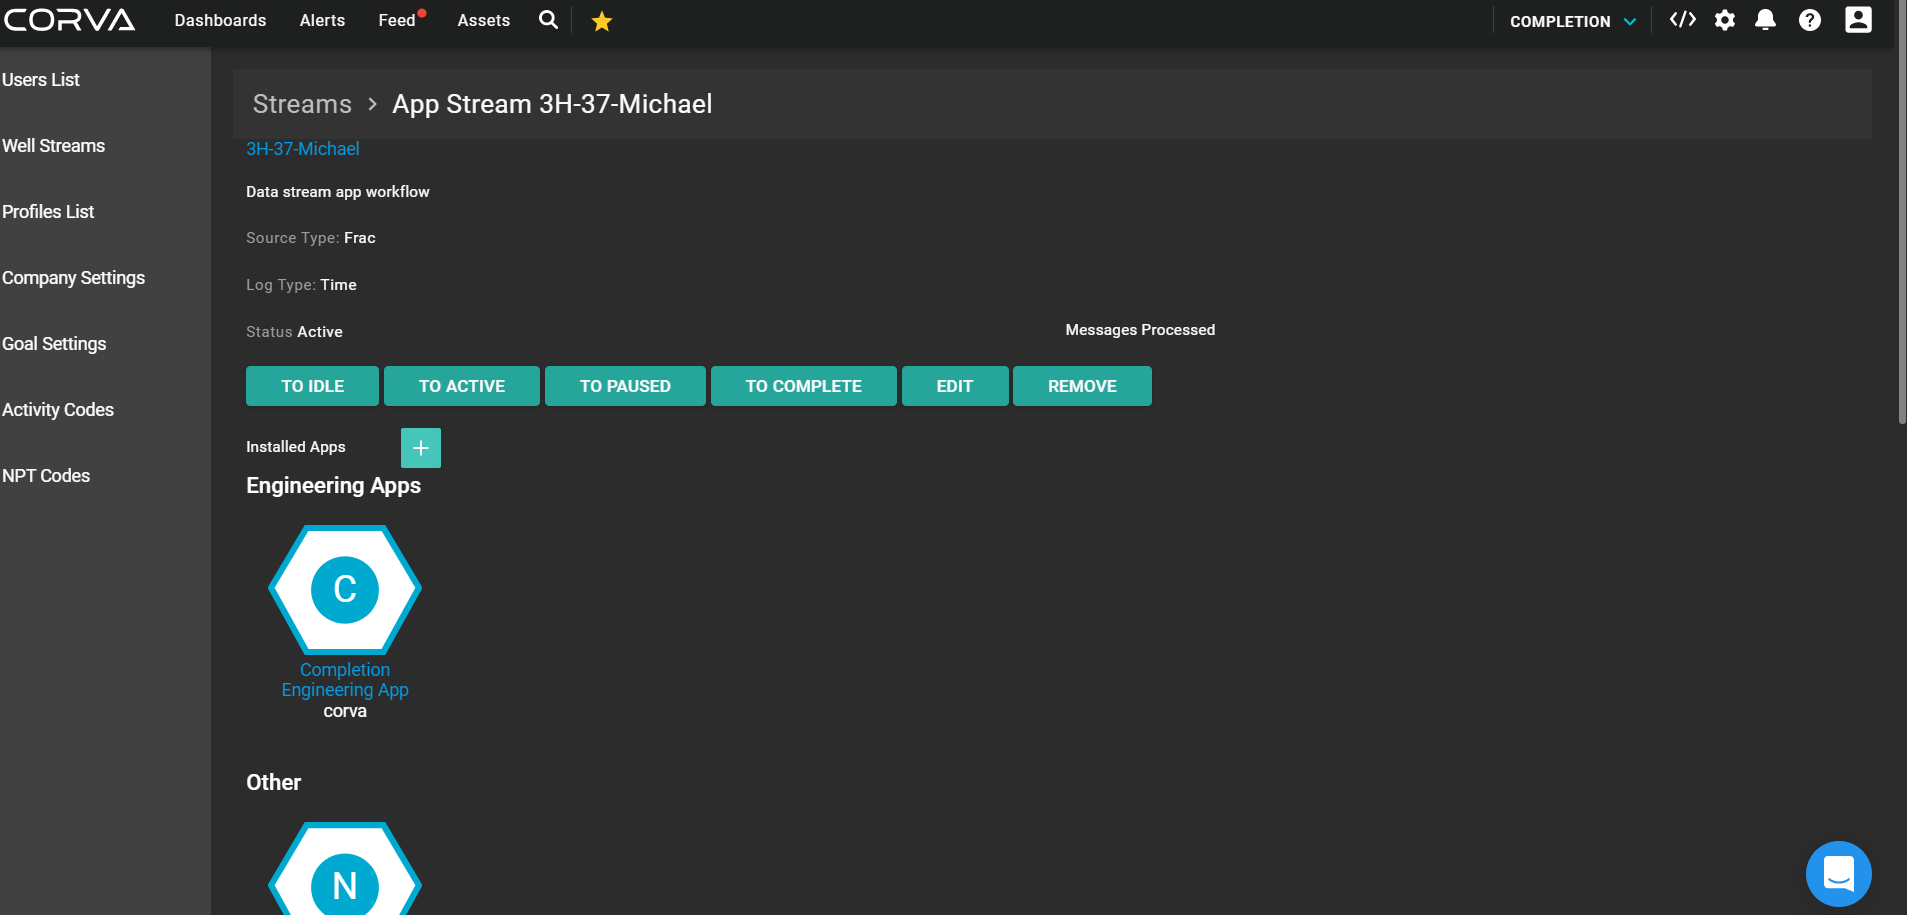
- Click on the
+button next to installed apps

Where to find the + button
- Within app store, search or filter to locate the newly created backend app

How to search for your new Back End app
- Click the
+ ADDbutton on the newly created app card
Add app to the app stream
- Your newly created app should now appear in the data stream app workflow page. This means that your stream app will be invoked every time a new data event is received from the enhanced WITS collection.
If everything went well, at this stage your app is up and running! Now, we’ll show you how to check your app’s log files to check for errors or other messages from your app.
6. View the App Log Files
Here’s how to access your app’s log files:
NOTE: In order to view videos in high resolution, please click on the Settings icon, then select the highest resolution available.
In your browser, click on the Dev Center icon in top right hand corner
Search for the desired backend app and select it from the app store
In the left hand navigation bar, select the
Log Filesbutton to see recent messages from your app to the Console logs. You can use the built-in filters to search for specific messages, keywords, or assets, and sort by the time the message was received